Cloudways Hosting – How To Make Your Website Insanely Fast in 2022!
Table of Contents
What is Cloudways?
Cloudways is an online hosting service. An online hosting service is where websites like this one have their data stored and transmitted throughout the internet. So, in order to have your own website, you have to use some form of hosting. Cloudways is one of the best and fastest options on the market today.
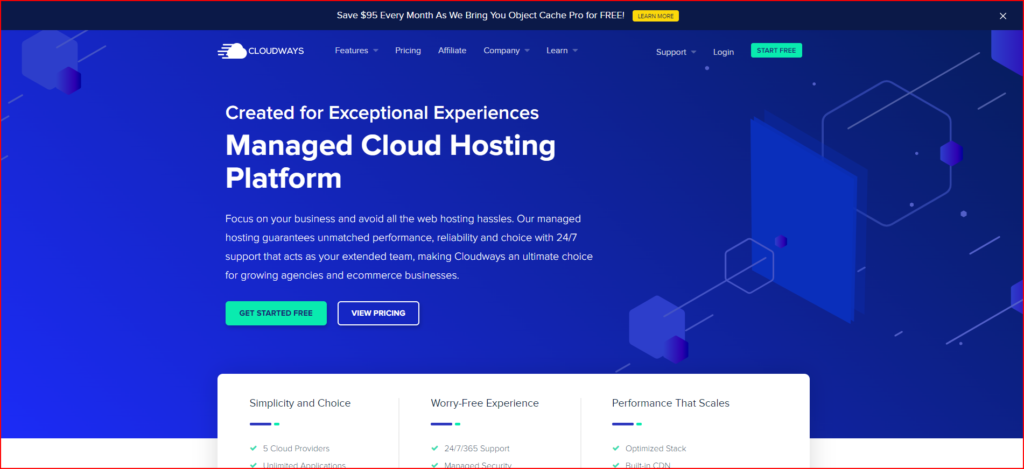
Best Managed Cloud Hosting for WordPress That Guarantees Success
“We live and breathe WordPress. Our managed hosting for WordPress and WooCommerce takes away cloud server-related hassles so you can scale your website the way you want. Our Cutting-Edge Managed Web Hosting features include advanced caches coupled with Breeze, a simplified Cloudways cache, and CloudwaysCDN for fast performance. They all come together to provide a seamless web hosting experience.”
Source: Cloudways.com
Some of the benefits that you get when hosting with Cloudways are:
- 5 different choices for cloud hosting roviders
- Unlimited Applications
- All PHP Apps Supported
- Innovative Control Panel
- 24/7/365 Support
- Managed Security
- Automated Backups
- 24/7 Real-time Monitoring
- Optimized Stack
- Built-in CDN
- Auto-Healing Servers
- PHP 7.3 Ready Servers
Cloudways hosting offerings guarantee that your site will be lightning quick.
How to set up a website on Cloudways hosting!
Cloudways offers a free 3-day trial for whenever you first start hosting with them. This is so that you can set your website up with them, test it out, and if you’re not satisfied you can simply not pay and the website will be deleted after three days.
Cloudways has a few different options for hosting services that they offer their servers for hosting your website. The hosting companies that you can choose from include:
- Google Cloud
- AWS
- Digital Ocean
- Vultr
- Linode
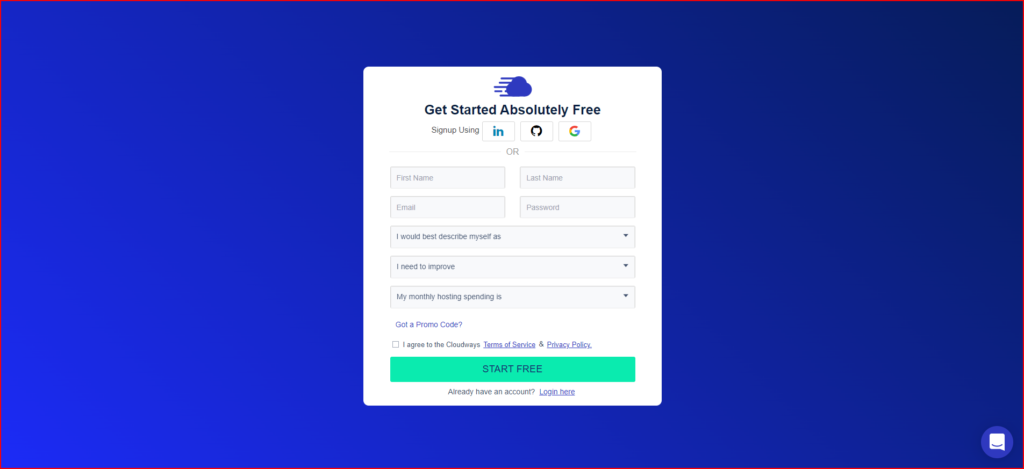
Step 1: Sign up for your FREE trial!
In order to get started with hosting your site on Cloudways, click on any one of the “Start Free” buttons to sign up for your free trial. You can sign up with them using your Google, LinkedIn, or Github account. If you don’t have any of those you can just sign up with your personal information including your email address.
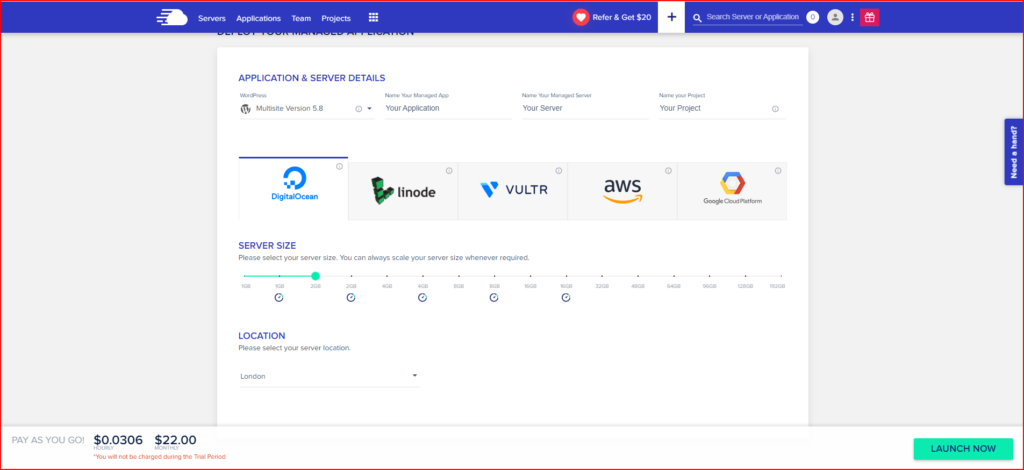
Step 2: Choose your hosting service plan!
As was been mentioned earlier, you have the option to select between 5 different hosting services that you can use through Cloudways managed cloud hosting. Those hosts include Digital Ocean, Linode, Vultr, AWS, and Google Cloud.
Above the different hosting services you will need to select the “application” you are going to use. The options include a regular WordPress install, a multi-site WordPress install, and a few others. After selecting an app to put on your server you can then name your app, server, and project inside said server. Make sure to also select a server location that’s as close to you as possible.
You will be charged based on which hosting service you use. You can customize your plan based on the amount of RAM, SSD storage, bandwidth, and the number of cores you want for the server you’re hosting your website on. For the purpose of this tutorial, we will be hosting the site Utensilslist.com (Also owned by this site’s owner/admin). The hosting plan being used is the lowest tier option for Digital Ocean.
Depending on which type of plan you choose you can see the hourly/monthly price that you will be charged for each plan as you can see at the bottom of the page for the picture below.
After deciding on your hosting plan Cloudways will take a few minutes in order to set up the server and get it ready to host your website for you. If you already have a website Cloudways offers 1 FREE migration done for you as a perk they offer. You can see the tutorial on their migration process in the video below.
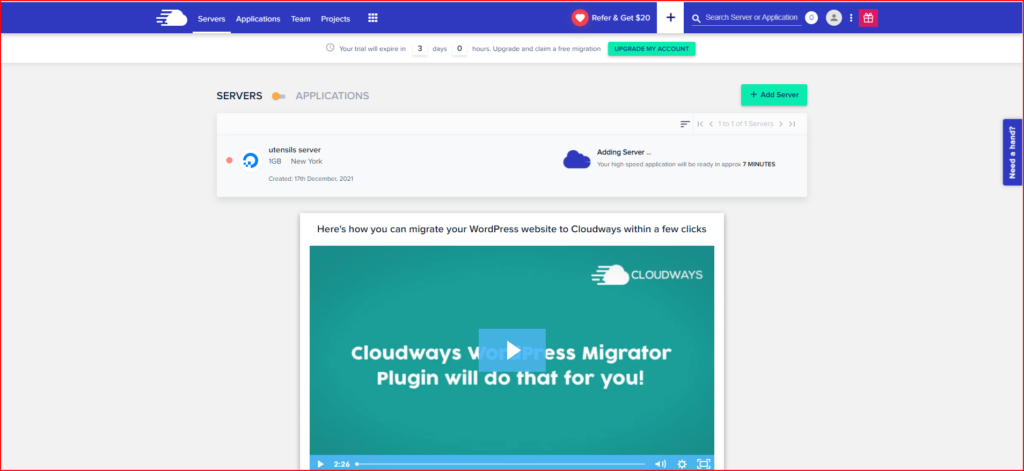
Step 3: Set up your WordPress website on your server!
After your server is done being set up it should look like the picture below.
There are a few things you should know about when you host with Cloudways. One of them is that you are charged based on the number of servers you use and the traffic each of them receives.
However, if you want to host multiple sites/apps you can do that on an individual server. So you can pay for one server and have more than one website on that server without paying extra for the hosting!
Step 3.1: Choose your own domain name!
In order to properly set up a website on your server, you need a website domain. Your website domain is basically the name/URL of your website. As I said previously, the domain being hosted on Cloudways in this tutorial is Utensilslist.com. If you are setting up an entirely new website and don’t already have a domain, you can purchase one from places like Google Domains, Go Daddy, Namecheap, etc. They typically range in price from, $5-20 on average depending on what type and where you buy one.
Once you do have your own domain, go to the Applications section inside your account. Select the application you want to set your website on. Inside the application on the list to the left of the screen, go to “Domain Management”.
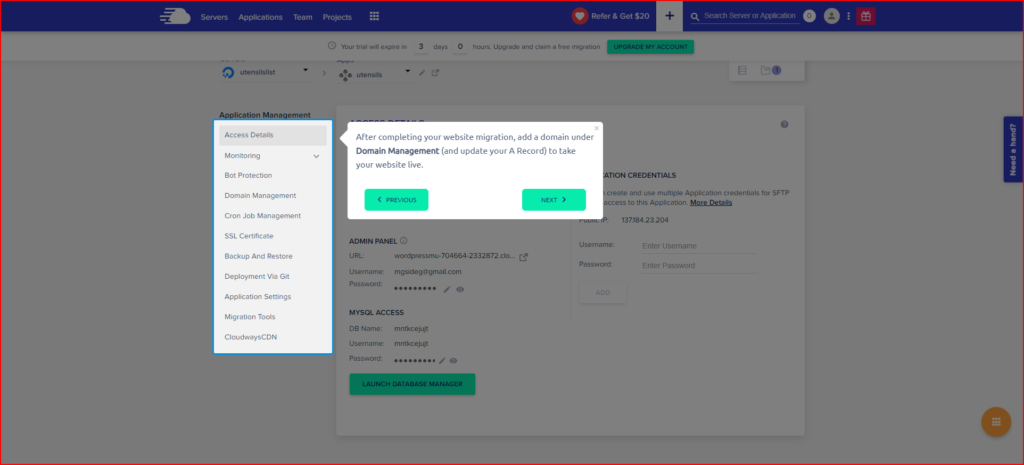
Inside the “Domain Management section, change the “Primary Domain” from the one set up for you to the domain name you selected. Then, click “Save Changes” so that the URL of your site is now that of your domain name.
Step 3.2: Point your domain towards your Cloudways server!
We are still not done with setting up your domain name, however! Click on the “more details button at the bottom of the Domain Management box that will show you how to point your domain name to your server.
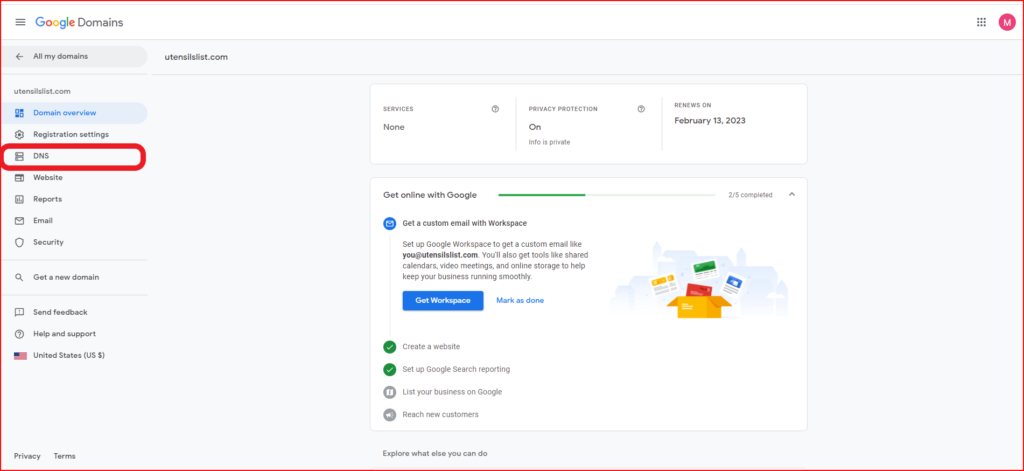
In this tutorial, I will be showing how to connect my domain name which is on Google Domains to our server. On the account page for your domain, go the the “DNS settings” page.
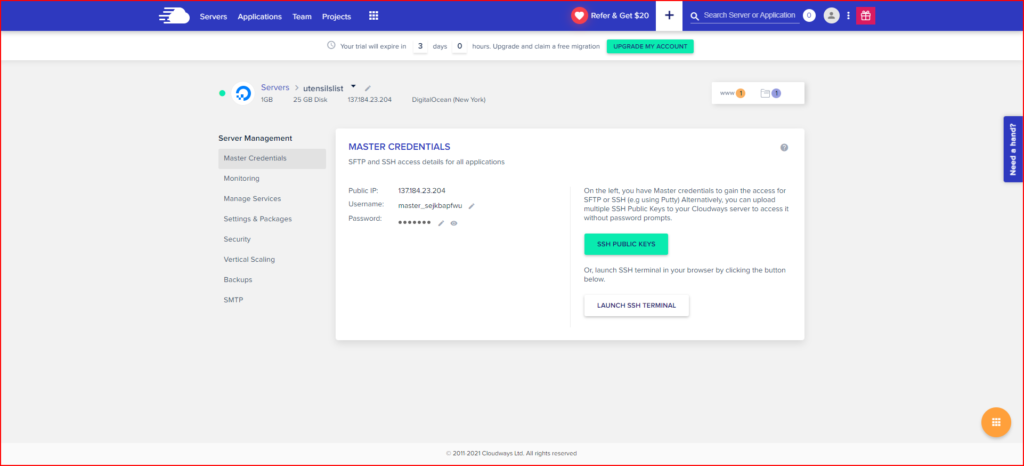
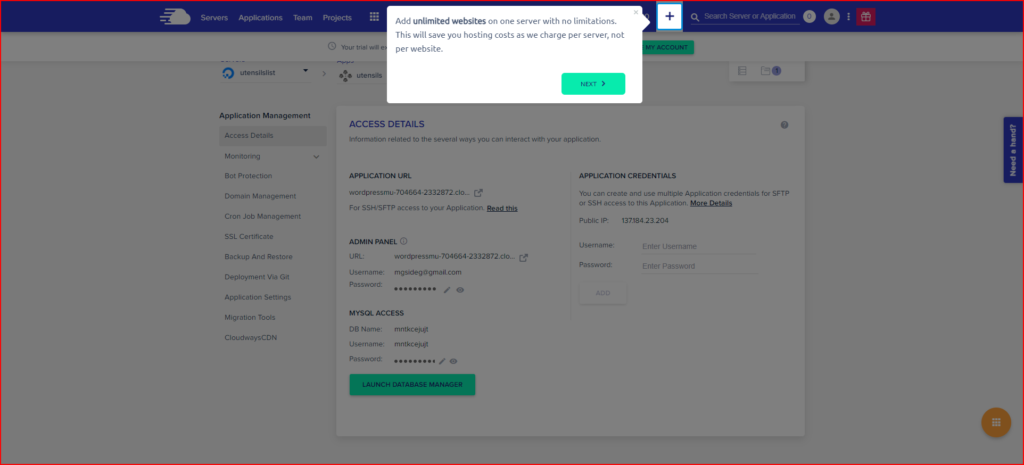
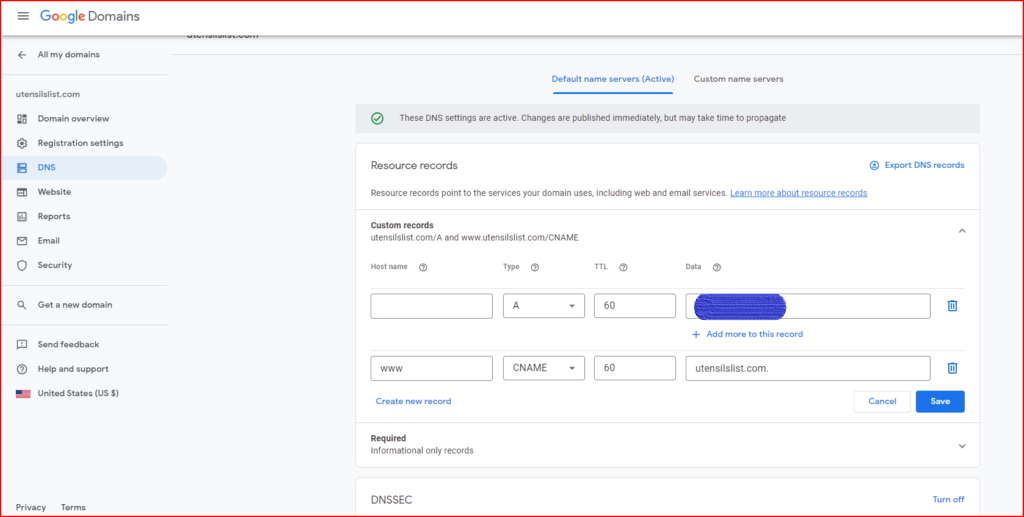
Enter your website information as seen in the picture below. You will enter the name of your own domain name in the place where Utensilslist.com is. In the area that is marked out, you will enter the Public IP address of your own server. You can find your server IP address in the “Access Details” section of your app/website or in the “Master Credentials” section of your server. Simply Copy and Paste it into the “Data” section of your A type record for your domain name. After doing that simply click on the save button to save your settings.
Step 3.3: Install your free SSL certificate!
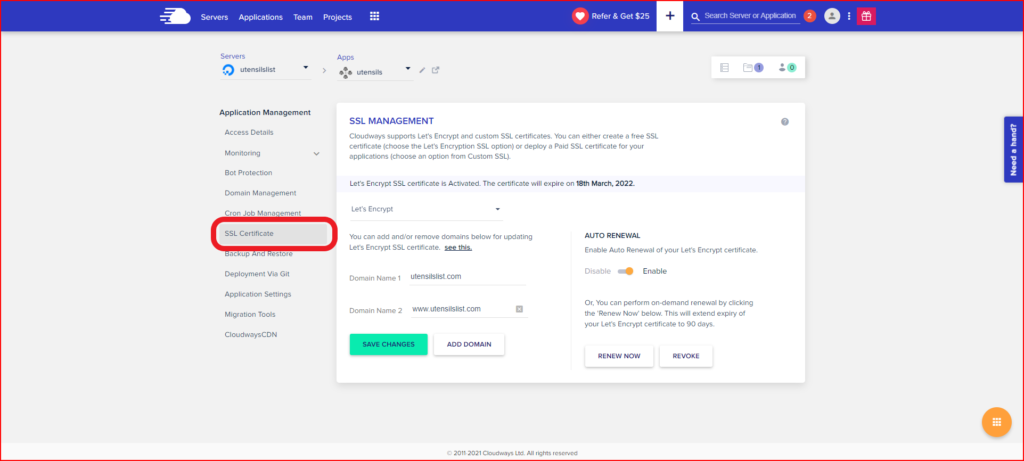
In order to have a functioning website nowadays, an SSL certificate is 110% required to have! Otherwise, some internet browsers, like Chrome, will not even show your website to anyone at all! Luckily, free SSL certificates are a perk that the vast majority of hosts including Cloudways offer nowadays.
In order to install your free SSL certificate on your hosting service, simply go to the “SSL Certificate” section of your app/website. Click on the drop-down list and select the “Let’s Encrypt” option. Then just click on the install certificate button. Cloudways will take a few seconds to install your certificate and then you’re good to go!
Step 3.4: Optimize your WordPress website!
[slm_content_lock]
Whether you decided to migrate your already existing site or are simply setting up an entirely new site you’ll want to set up a few optimization tools on your server and website in order to make sure it is as fast as possible.
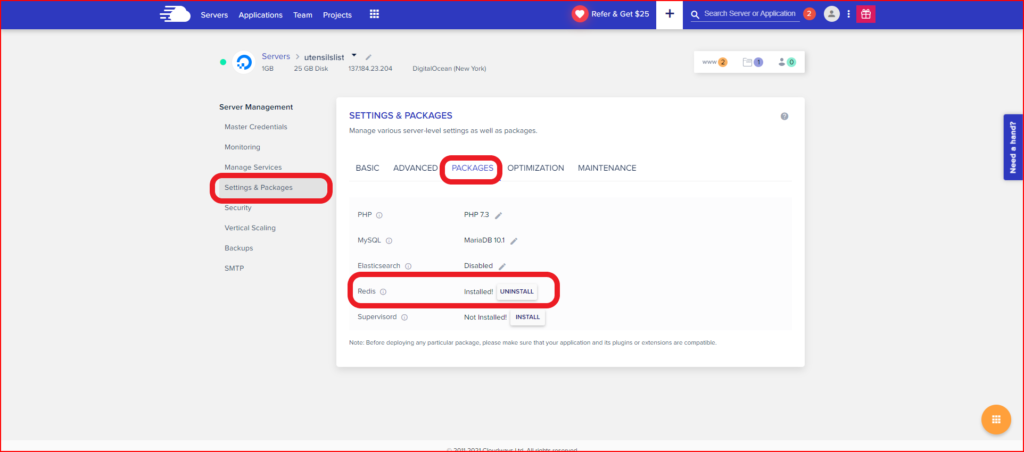
With that being said, first, we will change some settings on your server in order for your site to be as fast as possible. First, go to your server dashboards and go to the “Settings and Packages” section. Then, go to the “Packages” section inside of there. In this section, you will go down the list and find the “Redis” package. It should be uninstalled by default. Click on the install button and let Cloudways install the Redis package.
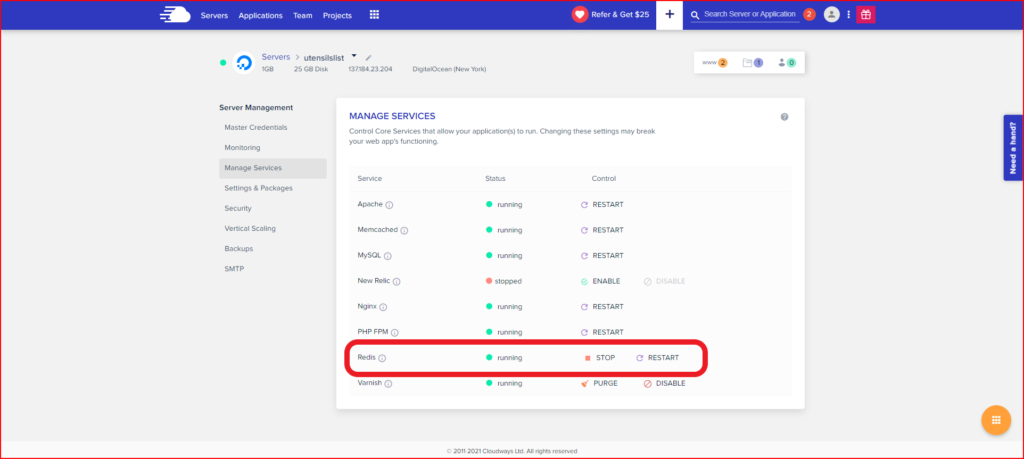
After you do that check and make sure that it is running in the “Managed Services” section. You should be able to see the Redis application in the list of services and it should show up with a green circle saying “running” next to it.
Another setting we will change is one inside of your app/website. Go to your application and then, go to the “Applications Settings” section. Inside of this section, click on the “WebP Redirection” option in order to enable it.
WebP is a “next-gen” image format that is more efficiently coded as compared to the usual JPEG or PNG picture formats. Enabling this option will allow you to reformat any and all of your website’s images to WebP, which will make your site faster. You will have to download another WordPress plugin in order to do this, but that process will be explained a little bit later.
In order to continue optimizing your website, you must enter your actual website. You can go to the “Access Details” section of your app/website and access your admin panel from there. Once inside go to the plugins section of your website. There should be a few plugins that were installed automatically when your server and website were first being set up. One of them should have been a caching plugin called “Breeze“.
If you don’t see it anywhere that’s fine. Simply click on the “Add New” section of your plugins. Then use the search bar to look for the Breeze plugin. Then you can just install and activate it. Once you’ve located/installed the Breeze plugin on your website go to the settings inside of the plugin.
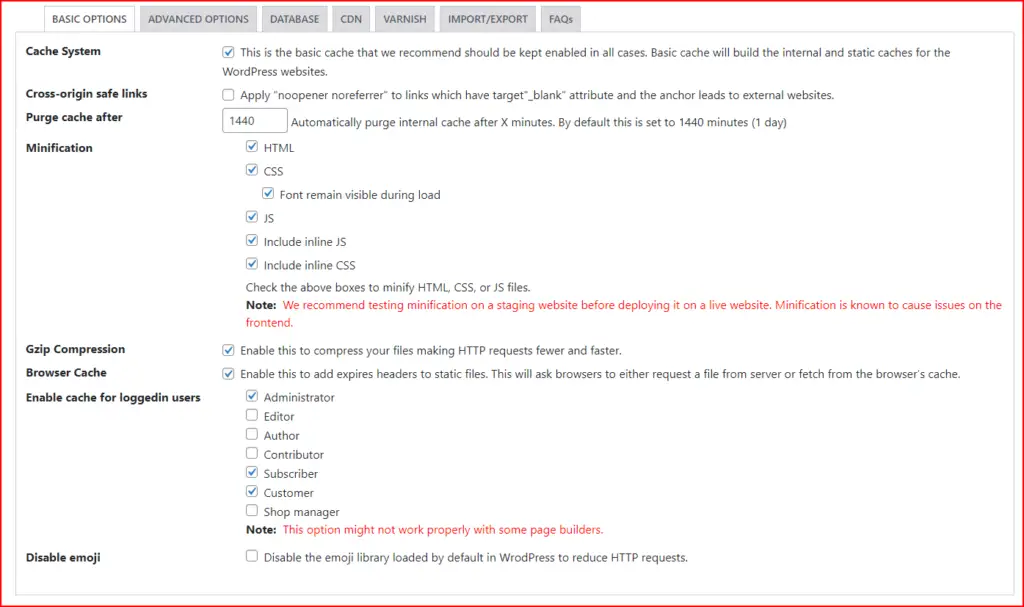
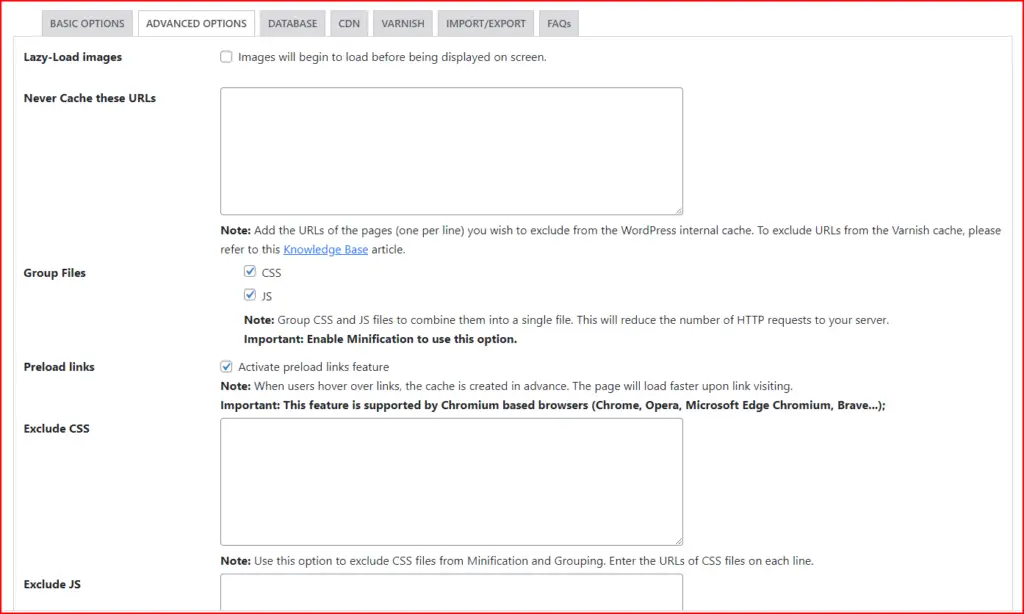
Breeze Optimization Instructions
Inside of the settings, click on the checkbox for each of the sections in the pictures below. Make sure to click the “Save Settings” button at the bottom before you move on to each section of Breeze settings.
Redis Optimization Instructions
After setting up the Breeze plugin we will be moving on to setting up the Redis. Breeze is the main caching plugin on your website that acts as your local cache. Redis acts as a server-side cache in order to further optimize your site’s performance.
Unlike the Breeze plugin, Redis is not automatically installed on your website. In order to install and set up Redis, you will have to go to the “Add New” section for plugins. Then search and install, then activate the Redis Object Cache plugin.

Once the Redis Object Cache plugin is installed go to the settings of the plugin. You will probably notice that the Redis caching isn’t connected just yet. There’s still some level of configuration your need to do on your WordPress website before Redis will start working. In order to set up Redis on your website the easiest way would be to download the WP-config file editor plugin for its “raw editing” feature. Unfortunately, the plugin had stopped being supported in late 2020-early 2021. So after these next few steps are completed MAKE SURE TO DELETE THIS PLUGIN AS IT WILL NO LONGER BE NECESSARY.
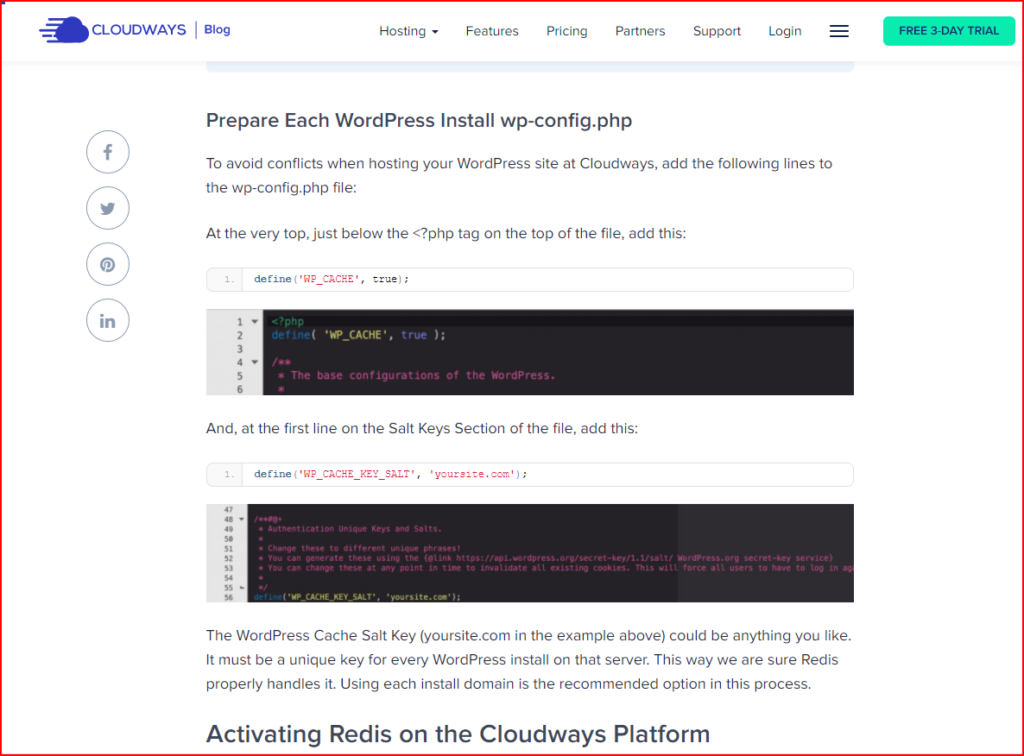
After downloading the WP config file editor you can simply follow the instructions Cloudways has on a page on their website about the steps needed to set up Redis inside of WordPress. Make sure to copy and paste the WP_CACHE_KEY_SALT line of code in the appropriate place as seen in the picture below using the config file editor plugin. Make sure to change the yoursite.com part to the name of your own domain, then save your changes when done.
https://www.cloudways.com/blog/install-redis-cache-wordpress/
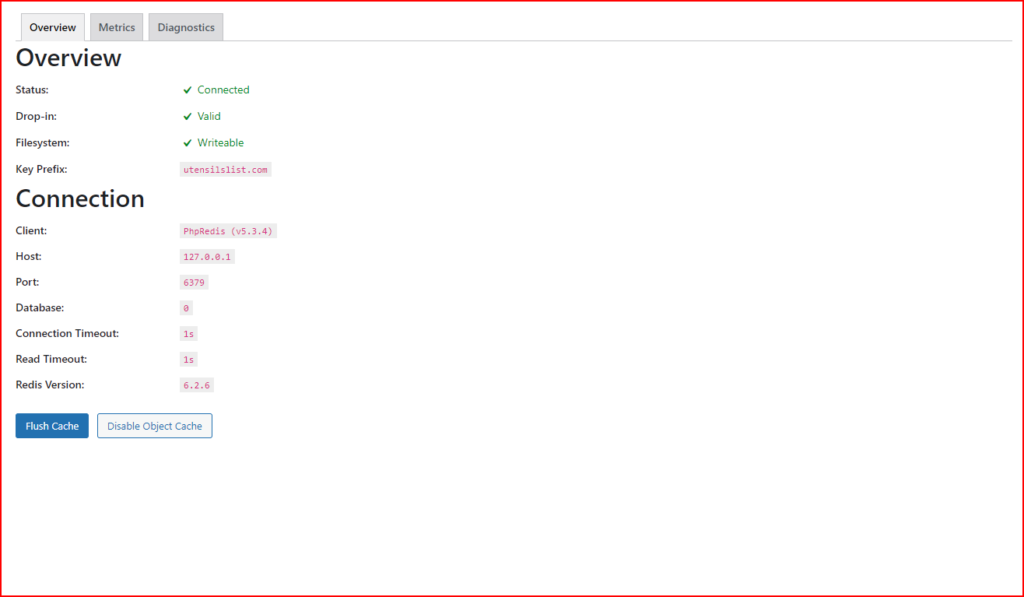
After following these steps make sure to delete the config file editor plugin. After that, you can go to the settings of your Redis plugin. Click on the “Enable Object Cache” button. If you followed the previous steps correctly, your Redis settings should look like the picture below.
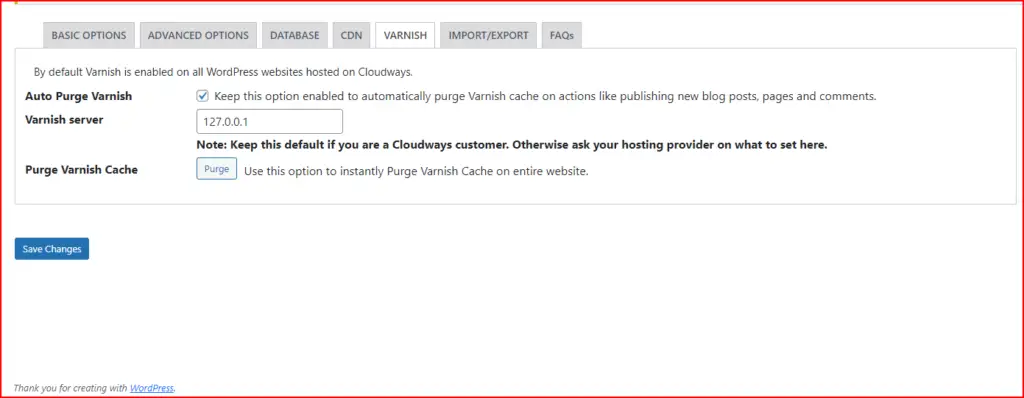
FYI WHENEVER YOU NEED TO FLUSH THE CACHE OF YOUR WEBSITE, YOU SHOULD DO SO BY FLUSHING THE BREEZE VARNISH CACHE AND NOT YOUR REDIS CACHE!
WebP Optimization Instructions
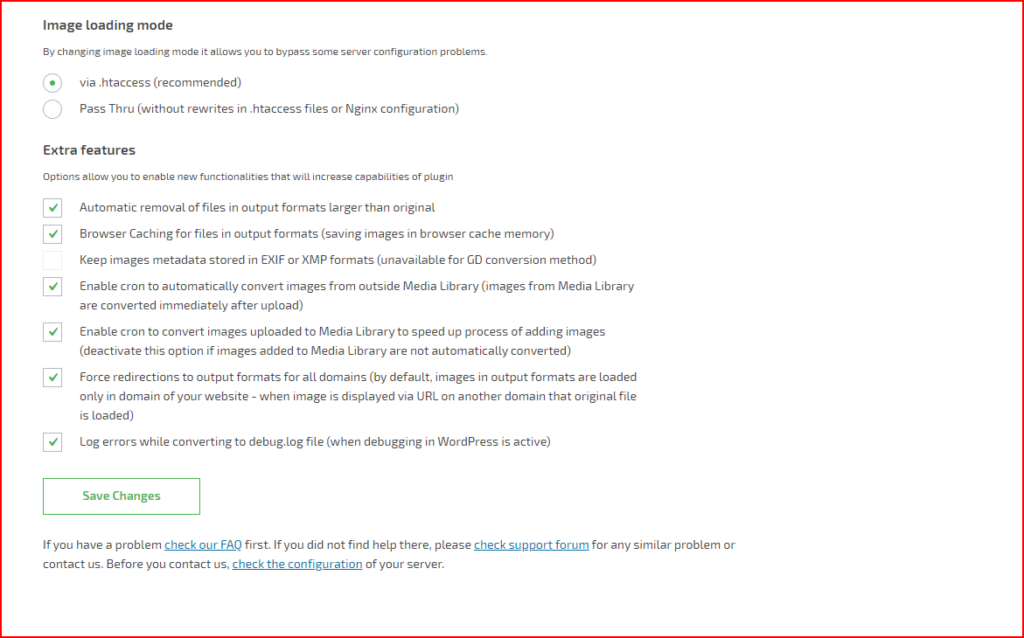
In order to optimize the images on your website by converting them to WebP images, you will need to install the free plugin called “WebP Converter for Media”. This plugin will convert all of your existing images to WebP using its “regenerate images” feature at the very bottom of the plugin although that process can take several minutes. In order to optimize any new images after they have been uploaded to your website and its media library check the boxes as shown in the picture below and make sure to save the changes.
FINAL BONUS OPTIMIZATION TIP: A COUPLE OF THE MOST OPTIMIZED THEMES THAT EXIST FOR SPEED ARE THOSE LIKE KADENCE, BLOCKSY, OR OCEANWP. UTENSILSLIST.COM USES BLOCKSY.
[/slm_content_lock]
Optimization Tests
After setting up your Cloudways and optimizing your WordPress website as much as possible it’s now time to test the performance of Utensilslist.com. We will test it using Page Speed Insights from Google and GT Metrix.
Page Speed Scores:
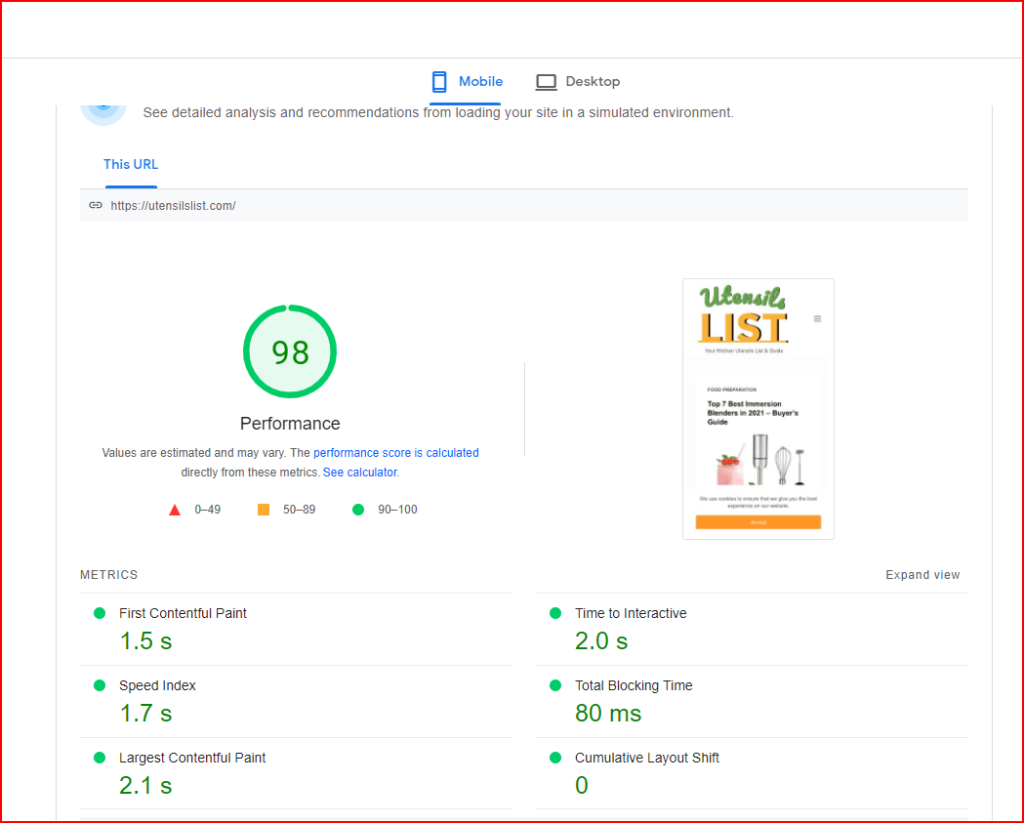
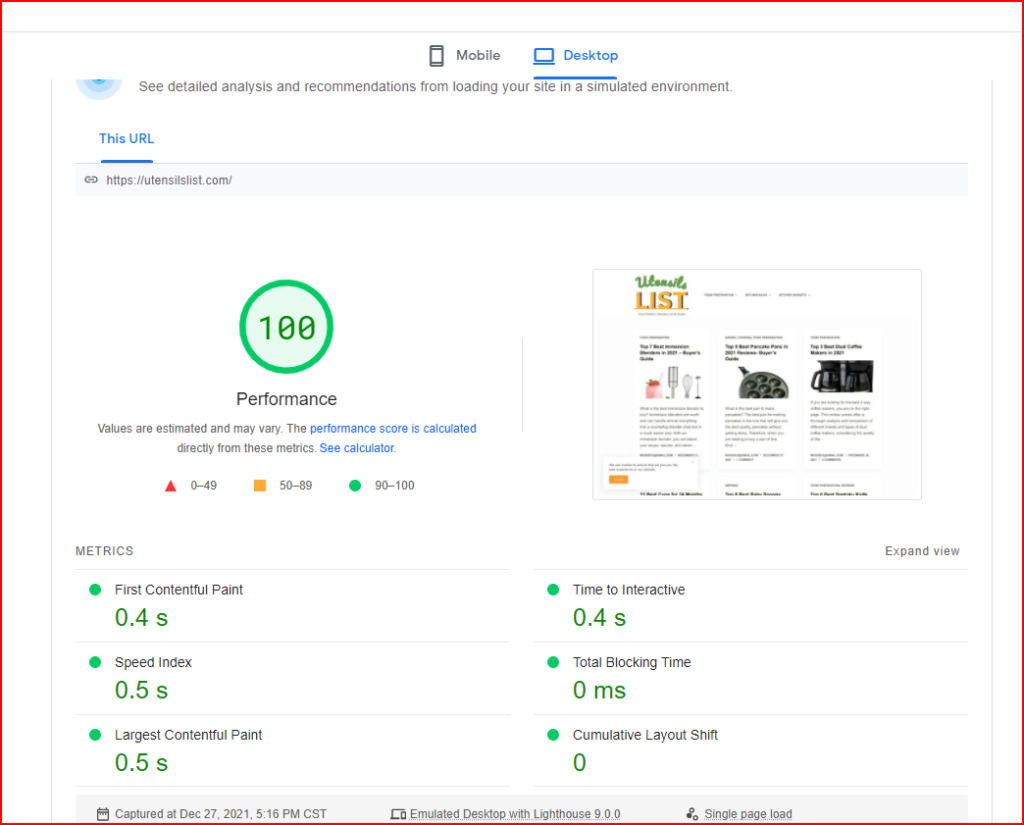
GT METRIX Score:
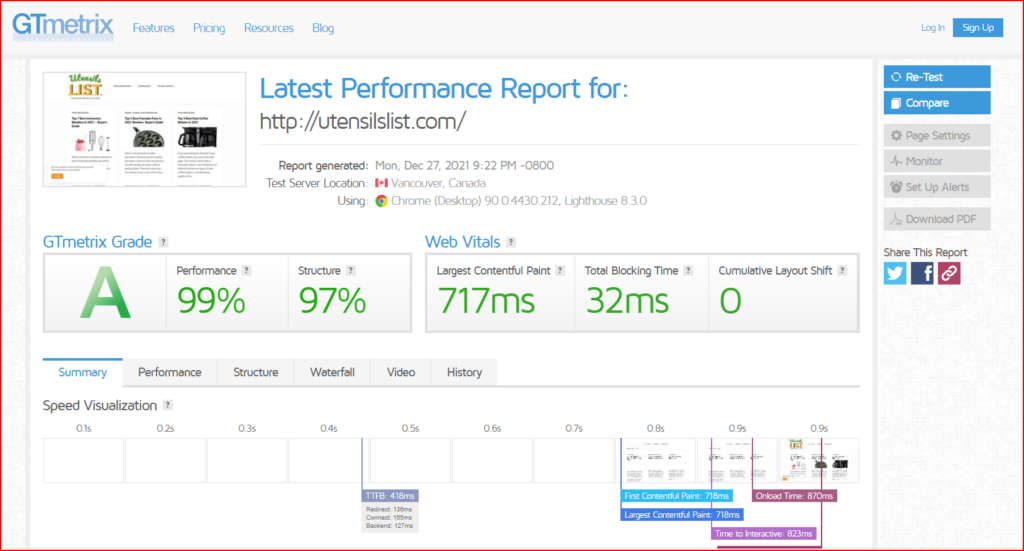
All in all, this is one of if not THE FASTEST website hosting available on the market right now! If you want to start your own website with super fast hosting for a great user experience and higher SEO rankings click on the link or button below!
https://www.cloudways.com/en/?id=1044025
Note: This page contains affiliate links that will, at no cost to you, earn me a commission. You are in no way obligated to click on the links!